
How to run a split test in Elementor for higher conversions
TL;DR:
- Running data-backed split tests in Elementor Pro prevents costly design guesswork that can lower conversions. Proper setup, including target audience segmentation and consent compliance, ensures reliable results for optimizing landing pages. Interpreting statistical significance correctly improves decision-making and prevents false positives, leading to continuous growth.
Redesigning a landing page based on a hunch is one of the most expensive mistakes a marketer can make. You swap the button color, rewrite the headline, and wait, only to find out months later that conversions actually dropped. Split testing, or A/B testing, gives you a data-backed way to answer "which version actually works better?" before you commit. This guide walks you through everything: the tools you need, the exact setup process, how to read your results, and the pitfalls that quietly ruin most Elementor experiments.
Table of Contents
- What you need for a split test in Elementor
- Step-by-step: Setting up your split test for Elementor
- Interpreting results: Statistical significance and data confidence
- Troubleshooting and best practices for reliable tests
- Integrating Elementor split tests with external platforms
- Our take: What most marketers miss about Elementor split testing
- Level up your split testing with no-code solutions
- Frequently asked questions
Key Takeaways
| Point | Details |
|---|---|
| Checklist saves time | Having all the requirements ready upfront prevents delays and errors when setting up your Elementor split test. |
| Statistical thresholds matter | Wait for at least 95% significance and enough test duration to ensure results are meaningful. |
| Consent compliance is critical | Cookie banner split tests need special tracking care to maintain legal and user trust standards. |
| Documentation speeds future tests | Each test you track and document builds a smarter process for your next optimization cycle. |
| Integration scales experimentation | Combining Elementor with platforms like Statsig yields richer data and more actionable insights. |
What you need for a split test in Elementor
Having understood why guessing on design decisions costs you conversions, let's break down what you'll need before launching your first test.
Running a split test in Elementor is more accessible than most people think, but there are a few hard requirements you shouldn't skip. Getting these right upfront saves hours of frustrating debugging later.
Core requirements checklist:
- Elementor Pro is required for full split testing functionality, including template duplication, popup experiments, and the conditional display rules that make audience splitting possible
- A clear hypothesis before you build anything. Without one, you'll collect data you can't act on
- Enough traffic to reach statistical significance in a reasonable time frame. If your page gets fewer than 500 visits per week, some tests will take months to conclude
- A tracking mechanism, either Elementor's built-in goal tracking or a connected analytics platform
- Consent compliance, especially in GDPR-regulated markets. Your tracking setup must respect user opt-outs
For stats interpretation, Elementor offers an A/B test significance calculator that outputs p-value and confidence intervals based on your entered visitor and conversion counts. This is the fastest way to sanity-check your results without needing a statistics background.
If you're new to the concept, a solid primer on WordPress split testing basics will give you the foundational vocabulary before you dive into configuration.
Comparison: Testing approaches in Elementor
| Approach | Best for | Complexity | Cost |
|---|---|---|---|
| Elementor Pro built-in | Simple page element tests | Low | Included in Pro |
| Popup template method | Cookie/consent banner tests | Medium | Included in Pro |
| Third-party tools (Statsig, etc.) | Advanced segmentation | High | Varies |
| External A/B platforms | Full funnel experiments | High | Separate subscription |
For SMB conversion optimization, the built-in Elementor approach covers most use cases, especially if you're focused on single-page experiments like headlines, CTAs, or hero section layout.
For consent banner experiments specifically, the popup template method works best. You create two versions of the popup, assign them randomly to incoming visitors, and track which version leads to higher opt-in rates. This approach requires a lightweight consent management plugin like Cookiez to ensure tracking remains compliant. Always verify that your experiment tracking fires only after a visitor has consented, or you risk a compliance gap. Understanding what drives reliable split test outcomes is just as important as the technical setup itself.
Step-by-step: Setting up your split test for Elementor
With your tools and prerequisites in place, let's walk through the actual process of setting up and running a split test in Elementor.
1. Identify one variable to test. Pick a single element: a headline, button label, hero image, or form layout. Testing multiple changes at once makes it impossible to know what caused a shift in performance.
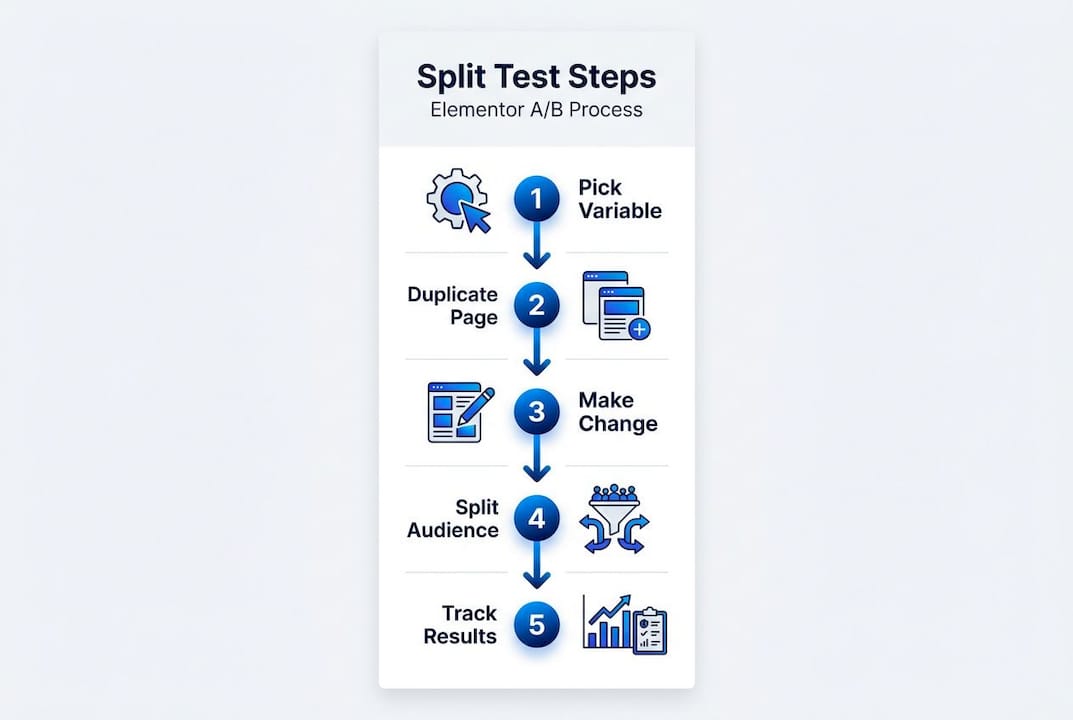
2. Duplicate your page or element. In Elementor Pro, right-click any template and select "Duplicate." Name your variant clearly (e.g., "Homepage Hero V2") so you don't confuse it with the control version later.
3. Make your single change on the variant. Keep everything else identical. If you're testing button color, change only the button color. Not the font, not the CTA text.
4. Configure the audience split. Use a plugin or Elementor's conditional display rules to assign visitors randomly between Version A (control) and Version B (variant). Aim for a 50/50 split unless you have a specific reason to skew it.
5. Handle consent banner experiments separately. Cookie banners need extra care because consent logic interacts directly with your experiment tracking. If a visitor hasn't consented, your tracking script shouldn't fire. The ultimate cookie banner A/B testing guide from Elementor explains how to structure these experiments without creating compliance conflicts.
6. Validate tracking before going live. Use browser developer tools or a tag auditing extension to confirm that goal events fire correctly on both versions. Check that consent-gated events aren't triggering prematurely.
7. Set a predetermined end date and sample size. Decide before you launch how long the test will run and how many conversions you need before calling a winner. This prevents the temptation to stop early when you see early favorable numbers.
8. Launch and monitor daily. Watch for anomalies in the first 48 hours: bot traffic spikes, broken tracking, or uneven audience splits can all corrupt your data before the test even gets started.
"Testing is not just a tactic. It's a discipline. The process you follow before, during, and after a test matters as much as the tool you use to run it."
Pro Tip: Use Elementor's popup templates to run consent banner experiments. Create two popup variants, randomize display using a condition rule or lightweight script, and track opt-in completion as your conversion goal. This keeps the experiment clean without requiring a full third-party platform.
Split testing is also one of the best ways to validate marketing ideas before investing budget in broader campaigns. If a headline variant outperforms the control on your landing page, that same messaging often translates to better ad copy performance. Following a structured improving conversions guide alongside your experiments keeps each test connected to a broader strategy rather than isolated tinkering.
Interpreting results: Statistical significance and data confidence
After launching your test, understanding what the numbers mean is critical. Let's decode the statistics behind your split test results.

The two most important numbers in any split test are the p-value and the confidence interval. The p-value tells you the probability that the difference you're seeing between variants happened by random chance. A p-value of 0.05 or lower means there's a 5% or less chance the result is noise, which most marketers treat as the threshold for a meaningful result.
The confidence interval shows the range within which the true conversion rate difference likely falls. A narrow confidence interval means your data is precise. A wide one means you need more traffic before you can trust the result.
Elementor's significance calculator lets you plug in your visitor and conversion counts for each variant and outputs both of these figures automatically. No spreadsheet formulas, no statistical background required.
Example data table: Split test results interpretation
| Variant | Visitors | Conversions | Conversion rate | P-value | Confidence |
|---|---|---|---|---|---|
| A (Control) | 1,200 | 84 | 7.0% | Baseline | Baseline |
| B (Variant) | 1,200 | 108 | 9.0% | 0.03 | 97% |
In this example, Variant B appears to be the winner. The p-value of 0.03 falls below the 0.05 threshold, and confidence sits at 97%, comfortably above the recommended 95% minimum. This is a result you can act on.
But here's where many marketers make a costly mistake: they check results daily and stop the test the moment one variant pulls ahead, even with only a few hundred visitors. This is called "peeking," and it dramatically inflates your false positive rate. You might stop on a day where Variant B happens to be ahead by luck, declare it the winner, implement the change, and later find out performance reverted to normal.
Pro Tip: Set a minimum sample size before you launch using a sample size calculator. A common benchmark is 100 conversions per variant before drawing any conclusions, regardless of what the percentage numbers look like early on.
For a deeper understanding of how to apply these concepts across different test types, the statistical interpretation guide walks through real scenarios with practical examples.
Troubleshooting and best practices for reliable tests
Knowing how to interpret results, let's make sure your test avoids common mistakes and yields results you can trust.
Even well-configured tests fail to deliver reliable insights when a few common errors creep in. Most of these are avoidable with a simple checklist habit.
Common issues to check before and during your test:
- Consent banner behavior: Confirm your tracking events respect opt-out status. Run a test session in incognito mode with consent declined and verify no conversion events fire
- Uneven traffic splits: Monitor daily visitor counts per variant. A persistent imbalance (e.g., 70/30 when you set 50/50) suggests a configuration error in your split logic
- Caching conflicts: Server-side or CDN caching can serve the same page version to every visitor regardless of your split rules. Disable caching for test pages or configure your cache to vary by the cookie that controls variant assignment
- Bot contamination: High traffic spikes with zero conversions often indicate bot activity. Filter by user engagement metrics to isolate real visitors
- Insufficient test duration: Stopping a test after just a few days often captures only one audience segment. Weekday visitors behave differently from weekend visitors
"Running a test for three days is like reading one chapter of a book and claiming you know the plot. Traffic patterns, user intent, and behavior shift significantly across the full week."
Conversion best practices consistently recommend running A/B tests for at least one to two full weeks to cover weekday and weekend variability and achieve genuine statistical significance. This is especially important for SMB sites where daily traffic volumes are modest.
Documentation is another habit most teams skip but always regret skipping. Keep a simple test log that records: what you tested, the hypothesis, the result, the sample size, and what you decided to do. When you return to the same page six months later, this log prevents you from re-running tests you've already run.
For specific guidance on one of the highest-impact test types, these headline A/B experiment tips show how to structure headline variants so your results are clean and actionable.
Integrating Elementor split tests with external platforms
Once you've mastered basic split testing, here's how to take your experiments to the next level with integration strategies.
Elementor's native testing capabilities cover most use cases for small to medium-sized businesses. But there are scenarios where pairing it with an external platform adds real value: multi-page funnel tests, server-side experiments, or when you need audience segmentation that Elementor can't provide on its own.
Elementor's own team demonstrated this in a real-world case: their navigation redesign experiment paired a redesign test with Statsig for audience randomization alongside Google Analytics for cross-validation. This kind of layered approach gives you higher confidence in your results and catches discrepancies between platforms before you act on misleading data.
Elementor-only vs. integrated approach
| Factor | Elementor only | With Statsig or GA4 |
|---|---|---|
| Setup complexity | Low | Medium to high |
| Audience segmentation | Basic | Advanced |
| Multi-page funnel tracking | Limited | Full support |
| Cross-validation | Not available | Available |
| Ideal for | Single page tests | Full funnel experiments |
Benefits of integrating external platforms:
- Richer event tracking across multiple touchpoints in a funnel
- Audience segmentation by device type, referral source, or behavior
- Cross-validation that confirms your Elementor results are accurate
- More robust reporting for stakeholder presentations
Caveats to keep in mind:
- More platforms mean more potential points of failure in your tracking stack
- Data discrepancies between tools require time to investigate
- Added cost if you're using a paid experimentation platform
For marketers ready to move into more structured testing workflows, the A/B integration workflows guide covers how to connect testing tools with broader marketing automation stacks. If you're evaluating enterprise-level options, the breakdown of Optimizely A/B testing offers a useful comparison for deciding when a dedicated platform makes financial sense.
Our take: What most marketers miss about Elementor split testing
Most guides stop at the technical setup. Here's the part that actually determines whether your testing program delivers compounding improvements or just a pile of inconclusive data.
The biggest mistake we see isn't a misconfigured plugin or a forgotten consent check. It's the belief that running more tests faster equals better results. Speed without rigor produces data you can't trust, and acting on bad data is worse than not testing at all.
Traffic quality matters more than most marketers realize. If your test page is receiving a significant share of bot traffic, paid traffic with different intent than organic, or returning visitors who've already converted, your results are contaminated before you even check the numbers. Segment your audience before you launch, not after.
The second overlooked factor is test documentation. Teams that keep records of every test they run, including the ones that showed no difference, build institutional knowledge that accelerates every future experiment. They stop re-testing things that already have answers and spend their budget on genuinely open questions.
Compliance is the third gap. Most marketers validate consent banner behavior once during setup and never check it again. But plugin updates, theme changes, and CMS upgrades can silently break your consent flow. Schedule a quarterly audit of your tracking stack, especially the interaction between consent tools and experiment scripts.
If you're looking to build a systematic approach rather than running one-off tests, the proven conversion steps framework connects individual experiments to broader site performance goals in a way that keeps every test meaningful.
Level up your split testing with no-code solutions
Running Elementor split tests is a great starting point, and the skills you've built here translate directly to faster, smarter experimentation across your entire site.
If you're ready to move beyond Elementor's built-in capabilities without adding developer complexity, Stellar's no-code A/B testing tools offer a 5.4KB script, a visual editor, real-time analytics, and goal tracking built specifically for marketers who don't want to wait on engineering. There's a free plan for sites with under 25,000 monthly tracked users, so you can test Stellar on your live site with zero upfront commitment. Pair it with the WordPress split testing guide to build a full experimentation workflow that covers everything from single element tests to full page variants.
Frequently asked questions
Can you split test cookie banners in Elementor?
Yes, you can split test cookie banners using Elementor popup templates and helper tools to manage consent tracking and audience segmentation. Elementor provides a dedicated cookie banner guide specifically for this use case.
How long should you run a split test for reliable results?
Run your split test for at least 1 to 2 full weeks to cover weekday and weekend variability and reach about 95% or higher statistical significance before making conclusions. Conversion best practices consistently support this minimum duration.
What does Elementor's A/B test calculator measure?
Elementor's A/B test calculator measures the p-value and confidence intervals based on visitor and conversion counts to help determine if test results are statistically reliable.
Is it possible to split test in Elementor without third-party tools?
Yes, basic split tests can be run directly in Elementor, but edge cases like consent banners require lightweight scripts or dedicated plugins for proper audience segmentation. The cookie banner testing guide covers those edge cases in detail.
How do external platforms like Statsig improve split testing?
External platforms like Statsig offer advanced segmentation and richer cross-validation, which is why even Elementor's own team used them in their navigation redesign experiment alongside Google Analytics for verification.
Recommended
Published: 5/4/2026